How to Make an Automatic Slideshow in Powerpoint 2010 TUTORIAL
How to Make an Automatic Slideshow in Powerpoint 2010
Create a self-running presentation
PowerPoint for Microsoft 365 PowerPoint for Microsoft 365 for Mac PowerPoint 2021 PowerPoint 2021 for Mac PowerPoint 2019 PowerPoint 2019 for Mac PowerPoint 2016 PowerPoint 2016 for Mac PowerPoint 2013 PowerPoint 2010 PowerPoint 2007 PowerPoint for Mac 2011 More...Less
You tin can apply a self-running presentation to run unattended in a booth or kiosk at a trade show or convention, or you can save information technology as a video and transport it to a client.
Ready upwardly a cocky-running presentation
To set up a PowerPoint presentation to run automatically, practice the post-obit:
-
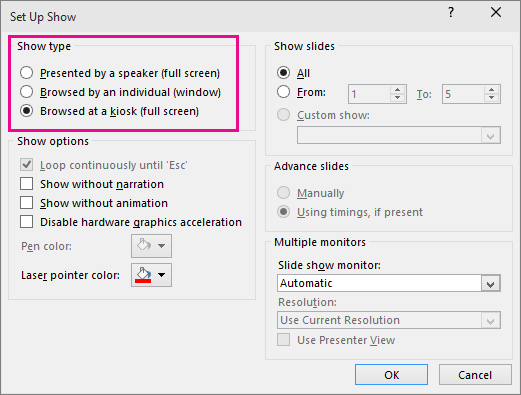
On the Slide Show tab, click Ready Slide Testify.
-
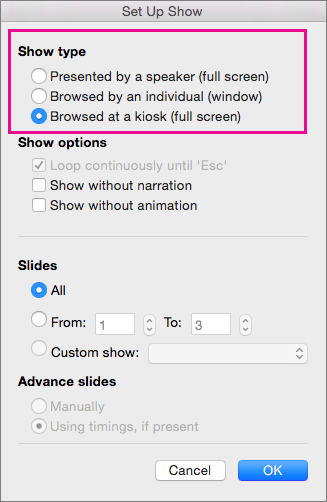
Under Bear witness type, choice i of the following:
-
To allow the people watching your slide evidence to accept command over when they accelerate the slides, select Presented by a speaker (full screen).
-
To present your slide testify in a window, where command over advancing the slides is not available to the people watching, select Browsed by an individual (window).
-
To loop your slide bear witness until the people watching press Esc, select Browsed at a kiosk (full screen).
-
Rehearse and record slide timings
When you lot cull the following show types: Presented by a speaker (full screen) and Browsed at a kiosk (full screen), yous'll desire to rehearse and record timings for effects and slides.
-
On the Slide Show tab, click Rehearse Timings.
Notation:The presentation timer begins immediately when yous click Rehearse Timings.
The Rehearsal toolbar appears and the Slide Fourth dimension box begins timing the presentation.
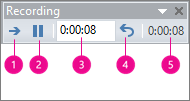
Effigy: The Rehearsal toolbar
 Next (advance to next slide)
 Pause
Pause Slide Time
 Repeat
 Total presentation time
 -
While timing your presentation, you can do one or more of the following on the Rehearsal toolbar:
-
To move to the next slide, click Adjacent.
-
To temporarily stop recording the time, click Pause.
-
To restart recording the fourth dimension after pausing, click Intermission.
-
To set an exact length of fourth dimension for a slide to appear, type the length of time in the Slide Fourth dimension box.
-
To restart recording the time for the current slide, click Repeat.
-
-
After you lot set the time for the terminal slide, a message box displays the total time for the presentation and prompts you to practice one of the following:
-
To go along the recorded slide timings, click Aye.
-
To discard the recorded slide timings, click No.
Slide Sorter view appears and displays the fourth dimension of each slide in your presentation.
-
Add together narration or sound
To record a narration, your figurer requires a audio bill of fare and a microphone, and a microphone connector if the microphone is not a part of your computer.
-
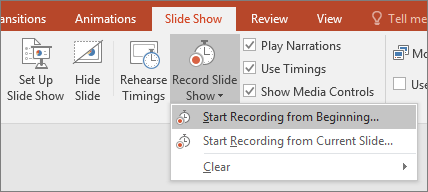
On the Slide Testify tab, in the Ready group, click the arrow on the Tape Slide Bear witness push.
-
Select one of the following:
-
Start Recording from Beginning
-
Start Recording from Current Slide
-
-
In the Record Slide Show dialog box, select the Narrations and laser arrow check box, and if advisable, select or deselect the Slide and blitheness timings check box.
-
Click Offset Recording.
Tips:
-
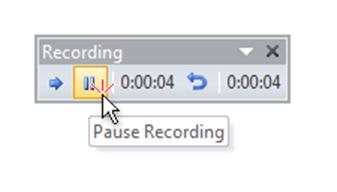
To intermission the narration, in the Recording shortcut menu in Slide Show view, click Pause . And to resume your narration, click Resume Recording.
-
-
-
To end your slide bear witness recording, right-click the slide, and then click Cease Evidence.
-
The recorded slide show timings are automatically saved and the slide show appears in Slide Sorter view with timings beneath each slide.
You lot tin tape a narration before you run a presentation, or you tin record information technology during the presentation and include audience comments. If you do not want narration throughout your entire presentation, you can record separate sounds or comments on selected slides or objects. For more details, see Record a slide show with narration and slide timings.
Add navigation
If you want your audience to motility through your self-running presentation freely, you can add hyperlinks or action buttons to provide navigation.
-
Hyperlinks
You can add hyperlinks that go to custom shows, specific slides inside your presentation, different presentations, Microsoft Part Word documents, Microsoft Office Excel worksheets, locations on the Net or an intranet, or e-mail addresses. Yous can create a hyperlink from whatsoever object, including text, shapes, tables, graphs, and pictures.
To learn how to add a hyperlink, see Create or edit a hyperlink.
-
Action buttons
PowerPoint includes prepare-fabricated activity buttons that you tin can add to your presentation and that y'all can define hyperlinks for. Action buttons contain shapes, such as right and left arrows. Use them when you lot want to include commonly understood symbols for going to adjacent, previous, outset, and final slides. PowerPoint likewise has action buttons for playing movies or sounds.
Add narration
Adding narration tin can aid deliver data more conspicuously in your cocky-running presentation.
To record a narration, desktop computers require a sound card, a microphone, and a microphone connector. Laptop computers require simply a microphone and a microphone connector. You lot can tape a narration before you run a presentation, or you tin can record it during the presentation and include audience comments. If you practice not want narration throughout your entire presentation, you tin tape divide sounds or comments on selected slides or objects.
Rehearse and tape slide timings
Note:Be prepared to begin timing your presentation immediately after you perform the kickoff pace in this procedure.
-
On the Slide Prove tab, in the Set Upward grouping, click Rehearse Timings.
The Rehearsal toolbar appears and the Slide Time box begins timing the presentation.
Figure: The Rehearsal toolbar
Next (accelerate to next slide) Pause Slide Time Echo Full presentation time -
While timing your presentation, do one or more of the post-obit on the Rehearsal toolbar:
-
To move to the side by side slide, click Next.
-
To temporarily stop recording the fourth dimension, click Break.
-
To restart recording the time after pausing, click Pause.
-
To set an exact length of time for a slide to appear, type the length of fourth dimension in the Slide Time box.
-
To restart recording the time for the current slide, click Echo.
-
-
After you set the fourth dimension for the concluding slide, a bulletin box displays the full time for the presentation and prompts you to do ane of the post-obit:
-
To continue the recorded slide timings, click Yeah.
-
To discard the recorded slide timings, click No.
Slide Sorter view appears and displays the time of each slide in your presentation.
-
Gear up up a presentation to run at a kiosk
Setting up a presentation to run at a kiosk allows you lot to control whether a mouse click anywhere on the screen advances a slide. For example, if you want your presentation to be viewed at a specific pace, fix automatic timings, and then set the presentation to run at a kiosk. To requite users additional control, you can add navigation, such equally hyperlinks or action buttons, to your slides.
-
On the Slide Testify tab, in the Set up Upwards group, click Prepare Up Slide Evidence.
-
Nether Prove type, click Browsed at a kiosk (full screen).
Important:If y'all set up a presentation to run at a kiosk, remember to as well utilise automatic timings or navigation hyperlinks. Otherwise, your self-running presentation will not advance across the first slide.
Meet Too
-
Turn your presentation into a video
-
Bundle a presentation for CD
Set a self-running presentation
To set upwardly a PowerPoint presentation to run automatically, practise the post-obit:
-
On the Slide Show tab, click Set up Slide Show.
-
Under Evidence type, pick one of the following:
-
To present your slide prove in a window, where control over advancing the slides is available to the people watching, select Browsed by an individual (window).
-
To loop your slide show until the people watching press Esc, select Browsed at a kiosk (total screen).
Annotation:Selecting this selection automatically selects the Loop continuously until 'Esc" check box and causes your slide show to run in a loop.
-
Set up slide transitions
If you lot want a slide testify to run automatically at a kiosk, you can control when and how the slides advance. To do this, you can apply the same transition to all slides in the presentation and ready the transition to automatically advance afterward a certain time interval.
-
On the Transitions tab, click the transition that you want.

To run across more transitions, signal to a transition, and then click
 .
. -
Do the following on the Transitions tab:
-
To set the amount of time that each slide is displayed, select Later on and enter the number of seconds you want.
-
To ready the duration of each transition between slides, enter the amount of time in the Elapsing box.
-
Click Apply to All.

-
Export a presentation to video
Y'all can export a presentation as a movie file. See Save a presentation as a film file for more details.
Set upwardly a self-running presentation
To prepare a PowerPoint presentation to run automatically, practice the following:
-
On the Slide Show tab, click Prepare Bear witness.
-
Under Prove type, pick one of the following:
-
To present your slide prove in a window, where command over advancing the slides is available to the people watching, select Browsed by an individual (window).
-
To loop your slide show until the people watching printing Esc, select Browsed at a kiosk (full screen).
Note:Selecting this option automatically selects the Loop continuously until 'Esc" cheque box and causes your slide evidence to run in a loop.
-
Set slide transitions
If you lot want a slide evidence to run automatically at a kiosk, you tin control when and how the slides advance. To do this, y'all can utilize the aforementioned transition to all slides in the presentation and set the transition to automatically advance afterwards a certain fourth dimension interval.
-
On the Transitions tab, click the transition that you desire, such as Cut, Fade, Wipe, or Split.
To encounter more than transitions, betoken to a transition, and then click the down arrow beneath the transitions gallery.
-
Practise the following on the Transitions tab:
-
To set up the amount of fourth dimension that each slide is displayed, select After and enter the number of seconds you desire.
-
To fix the duration of each transition between slides, enter the corporeality of time in the Elapsing box.
-
Nether Apply To, click All Slides.
-
Export a presentation to video
You tin consign a presentation every bit a pic file. See Relieve a presentation every bit a moving picture file for more than details.
DOWNLOAD HERE
How to Make an Automatic Slideshow in Powerpoint 2010 TUTORIAL
Posted by: duaneidowed1991.blogspot.com


Comments
Post a Comment